
If you’ve been around here for any amount of time, you’ve probably noticed that I love Evernote. I’ve been using Evernote for at least five years now. I’ve refined how I use it, I’ve talked with other moms who use it, and I’ve noticed online that there are many more people curious about it than people actually using it, so I thought it’d make a great blog series: How to use Evernote for homeschooling.
Why homeschool moms should use Evernote
Evernote is basically a digital blank canvas. It’s a bucket into which you can put anything: text notes, pictures, scans, pdfs, emails. Think of Evernote as your digital filing cabinet. Mostly it holds what has been paper in your life, but what doesn’t have to be paper anymore.
Your digital filing cabinet means that you don’t have to deal with and sort through so much paper – and also don’t have to worry about losing notes, spilling coffee on them, or keeping them filed just so. Better yet, rather than remember where you put a note, you can simply search for it – “Google” straight in your filing cabinet and it pulls up what you are looking for.
After all, being able to search, from my desktop, inside every document, my contacts, and my calendar all at once is the biggest boon of digital information. Flipping through a binder or file folder or pile, wondering just what you did with that list you are sure you made? A thing of the past.
A homeschool Evernote system allows you the ability to find the information you need by searching for it, to expand the amount of information you save and generate without taking up any more space, to shrink your paper files by digitizing and then shredding them, and to easily share information with your husband, grandparents, or friends.
So don’t let your gadgets go to waste; use them to make your life simpler.
It seems like the biggest stumbling block homeschool moms have to using Evernote for their home or homeschooling is the hurdle of not knowing how to start, combined with a fear of learning a new set of tricks and of not doing it “right.”
So, let me hold your hand and show you how easy it really is.
How to organize Evernote for homeschooling
Don’t miss the download at the end of this post with set-up instructions in a handy, compact, visual pdf!
First, you will need to create a free Evernote account.
Then, when you open it up, you have one big empty bucket and it can be paralyzing to know what to do next.
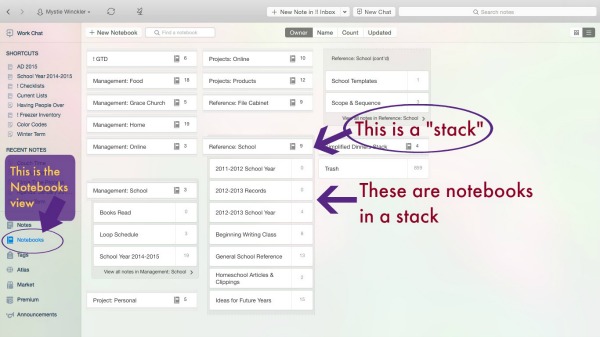
Before we get started creating your filing system, let me clarify the Evernote terminology.
- A note is a note – like one sheet of paper – that can hold text and images.
- A note is kept in a notebook, a file folder holding as many notes as you want.
- Notebooks can be collected together into stacks of related notebooks.
Looking at it like an outline, it would go like this:
I. Stack
A. Notebook
1. Note
2. Note
3. Note
B. Notebook
C. Notebook
So, we’ll start by creating the stacks. You’ll want to be in the “notebook view,” create a few notebooks, then drag them together to form a stack.
You’ll want at least these homeschool stacks: Reference: Homeschool with notebooks of saved information and big picture plans, School Year 2015 for current plans and notes, and Records: Homeschool for previous years’ plans and information.
For the rest of the series we’ll be creating more notebooks and notes to fill in your Evernote structure.
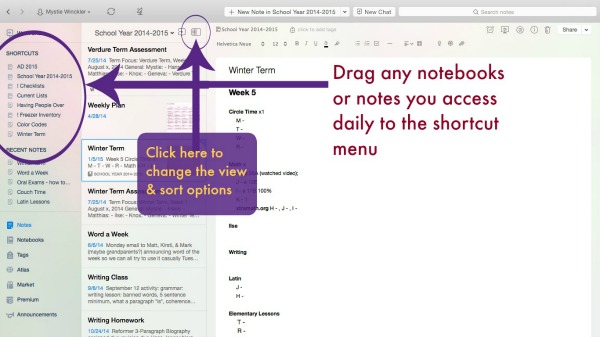
To make your Evernote more useful, you’ll also want to drag that current school year stack into your shortcut bar. Click on and drag the icon over to the far left, as shown here:
With your Evernote installed, a few stacks created, and your shortcut menu set up, you’ll be ready to follow along with the rest of this series as we fill up our Evernote with handy homeschool plans, resources, research, and more!
Make a Homeschool Scope and Sequence in Evernote
I know most people – if they make a scope and sequence at all – make one in a spreadsheet or a table. I’ve made plenty of those before myself. However, I can’t make them look good, and I usually way over-plan.
Now, I have a basic guide scope and sequence in list form within Evernote. Here’s what it looks like:
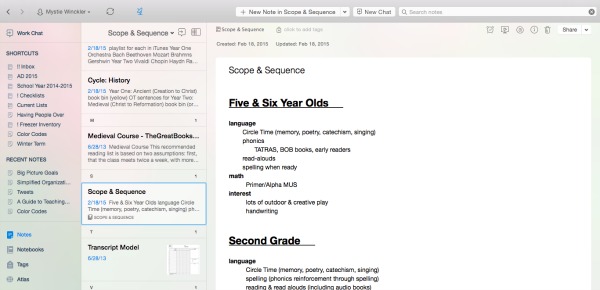
.
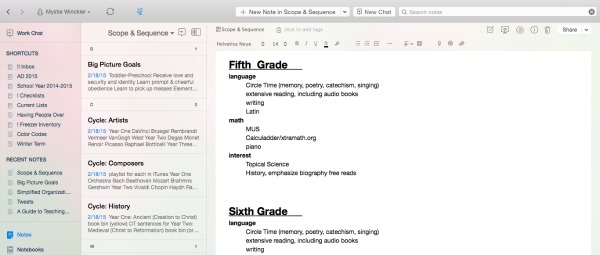
Simple, not over-done, and principle-driven rather than curriculum-driven. Of course it’s still idealistic, but aren’t all big picture plans?
Make Homeschool Vision and Goals Statements in Evernote
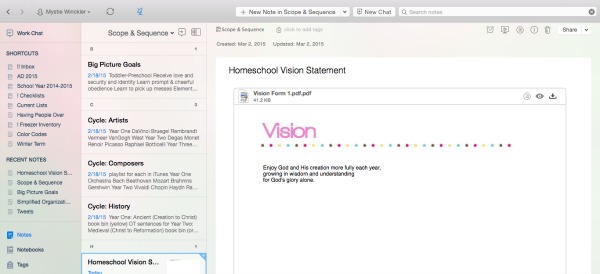
I think Pam’s instructions and formula for making a big picture vision statement and yearly goals is one of the clearest and easiest-to-follow out there. My first vision statement and overarching goals I have on paper and transcribed into Evernote, but I recently used her vision workshop form to write a newer, more concise version and then saved it on the vision form from her Plan Your Year Kit straight into Evernote:
Then separately I also have overarching goals for each phase of education: toddler-preschooler, elementary, middle school, and high school. It looks like this:
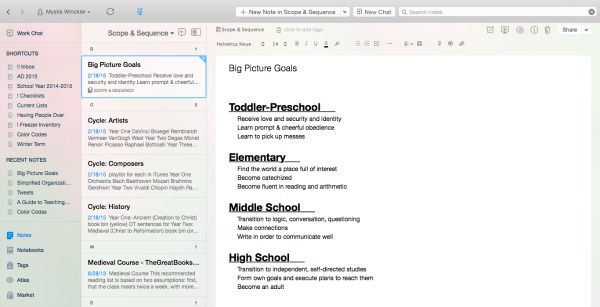
Again, it doesn’t have to be complicated, and the few format options allowed by Evernote help me remember to keep things simple.
Homeschool Big Picture Notes That I Have in Evernote
These are some of the notes in my Big Picture notebook:
- Cycles for composers & artists (a 3-year rotation that I have only sporadically followed)
- Lists of memory work we’ve done, by type (poetry, hymns, Scripture, catechism)
- Big picture goals
- Yearly scope and sequence overview summary
- Example of a transcript form for future reference
- Vision
- Definitions of education
Evernote is a great program for homeschool planning. Anything you would have in a homeschool binder, you can keep in Evernote.
How to Use Evernote for School Book Lists
A reader once asked:
One thing I struggle with is trying to organize and maintain a booklist both for read alouds and for my kids to read. There are so many wonderful websites and it’s difficult to get it all in one place that is accessible when I’m out and about at the library, book sales, etc.
So I’m wondering what you use to keep track of books you want to keep in the pipeline for your family? Something you can access when you are out.
Most of my intense book list days were back in the days of paper printouts and notebooks in my purse. As I transitioned toward digital planning, I was also slowing down book collecting, but even so, I do most of mine online so I haven’t worried too much about offline availability. If I’m at the local library sale, there’s wifi, and most of my other book-buying is through Amazon used or paperbackswap.com. I almost never browse the actual library shelves, either, but search their online catalog, place a hold, and just run in and grab my books the librarians have already pulled off the shelf for me.
Now that we’re further down the road and I have a wider age range, I’m afraid we’ll miss reading an essential story to the middle or younger set as we keep moving forward with the older ones.
But a book list helps with that, too.
Book Lists for Reference
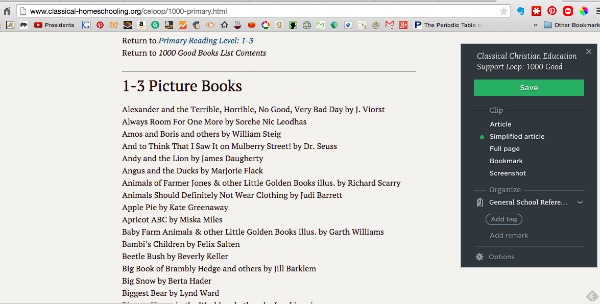
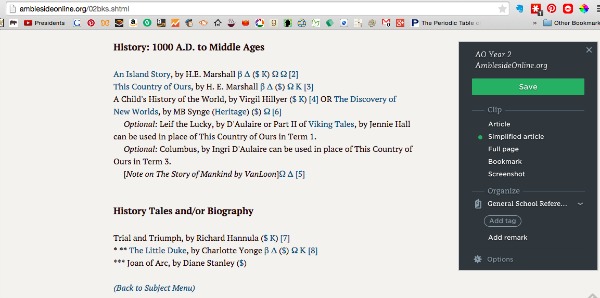
- Create a notebook in your homeschool reference stack that is solely for booklists.
- Use web clipper to save online book lists like 1000 Good Books list.
- Use the web clipper to save a screenshot of a book you want to add to your booklist.
This reference notebook is like your catch-all bucket for all the book ideas. I’ve saved descriptions of books from Exodus Books, added items to my cart and then taken a screenshot (with web clipper) of those books and saved it to Evernote, saved Well-Trained Mind Forum threads with book lists, and of course saved straight book lists like Christine Miller’s 1000 Good Books list.
In fact, if you’ve already saved some book lists in Evernote, we can even share them with each other by email. My friend who does the kids’ book club emails me her Evernote book list of the books she’s chosen. If you have book lists you’ve created or saved, tell us in the comments and we can send them to each other and not each duplicate work! :) I, for one, would like a simple book list for each year of AO. And to share, I have compiled the Omnibus book lists into a simple book list (with edition and translator noted) so I can keep my eyes peeled for those.
Book Lists for a School Year
- You’ll also want a book list note in each School Year notebook, so you have a record of what you read in first grade, so that when you return to first grade with another child, that book list is ready to go. Make sure to note where you got the book: is it from your own collection, from the library, free online, on your kindle – make it easy to find again.
- Keep a separate note for a pared down, “I really want to be on the lookout for these” books, apart from your big reference notebook.
Because I don’t pay for Evernote premium, I have – from my laptop at home – emailed notes like this to myself so they’re in my inbox to pull up and reference while I’m out. It’s a quick workaround, and it’s much faster than having my poor little iPod work to index my entire Evernote collection to find what I’m searching for.
Book Lists for Books You Have
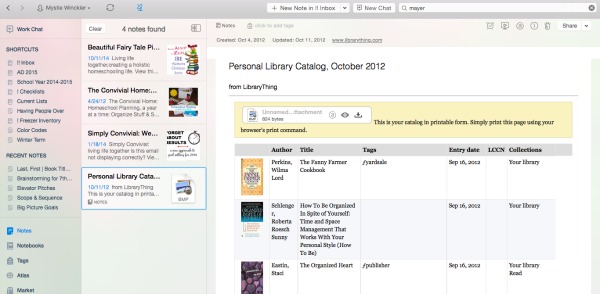
You might consider beginning a personal library notebook, also. Especially as your collection grows, it’s nice to be able to quickly search for books by the same author, books tagged as “medieval,” or audio books you have downloaded.
I am currently cataloguing my library with Delicious Library, and have also used LibraryThing previously, but it’s possible to keep a library catalog in Evernote, too.
- Make a “Personal Library” stack.
- Make a notebook for different categories of books, either based on how you shelve your books or some other way that would make it easier to browse.
- Make one note for each book, with the author’s name (Last, First) and the book title as the note’s title.
- Take a picture of the book if you’d like so that a cover image is a part of the browsing experience.
I use Delicious Library or LibraryThing so that I can simply enter the ISBN (or even scan it) and have all the information auto-pulled from Amazon. Using Evernote this way means you have to do all the data entry yourself.
Another way to do it, though, is to use LibraryThing or Delicious Library – which do not have mobile apps (it’s a restriction based on Amazon’s terms of use – Amazon doesn’t want you browsing local used bookstores) – and then export your library list and save it within Evernote. This is a great backup plan, too, and also makes it possible to easily share your catalog or have titles come up as you’re searching within Evernote.
I’m sure there are more ways to use Evernote for book lists and book reference.
Plan a Homeschool Year in Evernote
Planning a homeschool year, especially if you have multiple students, means managing and coordinating a lot of moving pieces. When I plan, I do use paper for brain dumps and brainstorming and for initial lists just to get the ideas out of my head and think about them. But when I’m ready to plan in earnest, I transfer those written notes into a digitally-kept plan, which is eventually all saved into Evernote.
I’m a planner by nature, but I’ve been referencing the Plan Your Year Kit for planning because it’s so handy to have a no-nonsense reference for what to do as I go along. So now this year as I’m in the very beginning stages of putting together a homeschool plan, I am roughly following her planning checklist, referencing sections of her book when I need ideas for a certain step.
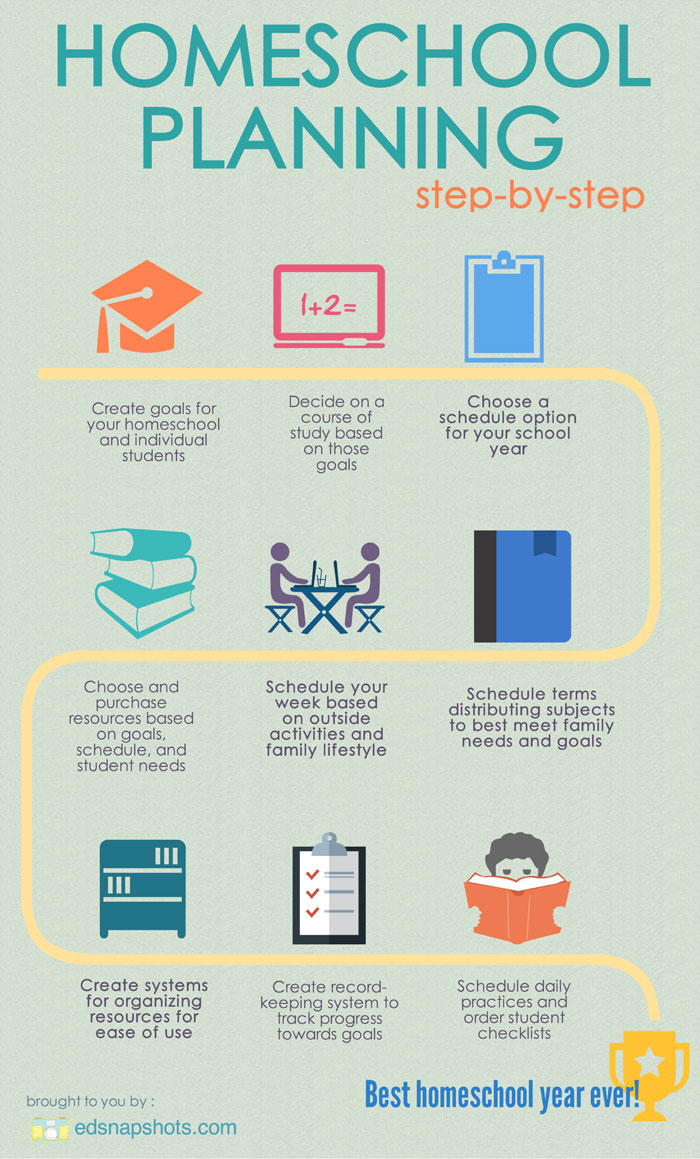
1. Goals
I like to keep all my goals for all my kids (I make them for myself and the toddlers as well as the students) on one list. It goes into the School Year 20XX-20XX notebook with the title 20XX Goals. In 2012, I started off writing them in tables in the word processor, then later in the year moved them to Evernote by copying and pasting, and it turned out ok:

Last year I used the Plan Your Year sheets and saved those edited pdfs into Evernote:
Now this year I’m using Pam’s free guide to writing goals (she has a great formula and a helpful list of verbs), but just writing them directly into Evernote in list format. When I post about our upcoming homeschool year, I’m sure you’ll get a peak.
One of the reasons Evernote works well for me is that I think and write in lists by default.
Tables are useful and I do use them in word processors, but for the most part, keeping lists rather than tables feels like a good fit to me. If you are more of a spreadsheet sort of person, you can either save them into Evernote as pdfs when you’re done (you won’t be able to edit them), or use Google Drive or a folder on your computer with files. One problem with the folder and files method that I have run into, however, is old files from previous versions losing their formatting and also when I got a new computer, I didn’t move over all those old files, so then I don’t have them handy anymore.
Evernote can be installed on any computer or logged into in an internet browser, and I have access to everything I have saved. To find anything I wrote in a word processor from pre-2012, I have to go hunting on the old computer or on a backup drive.
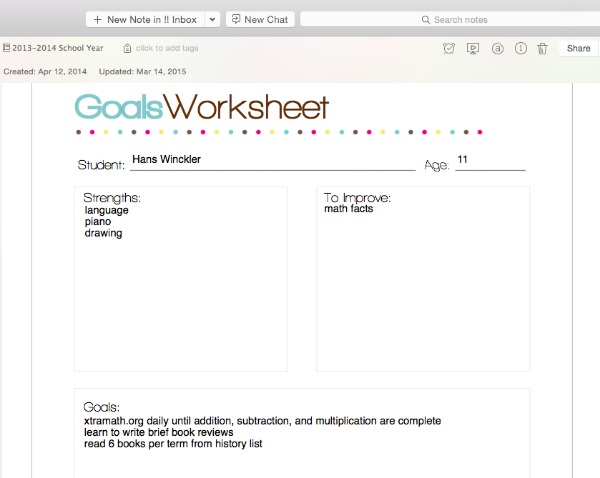
2. Course of Study
To determine our course of study, I first refer to the research and notes I had saved previously, usually using web clipper, into my “Future Years” notebook. I have also had a “7th+” note where I’ve kept ideas for two years now. When it came time to start planning 7th grade, I pulled up the research and that specific note, deleted the ideas I knew I wouldn’t use, consolidated things, brought likely candidates up to the top of the note, and generally ruminated on it all.
Then I did some paper-based brainstorming, just because writing things out helps your mind think through things in a different way. My brainstorming always comes out as lists.
Now I’m in the process of merging my notes and ideas and creating a plan, which I’m doing both in Evernote and in Pam’s planning pages. I transferred my written lists into an Evernote note, cleaned up and improved. I’m almost ready to dig into the course of study planning sheet, but haven’t made it that far yet. Here’s one from last year:
3. Year’s Schedule
Making the yearly schedule is pretty streamlined for me now. We school year-round, dividing the year up into 6 terms of 6 weeks each, with a 1 week break week between. This leaves us with enough time to take a 3 week Christmas break, end school in May, and have all of June off.
It always flexes a little every year based on what’s going on. Last year we didn’t start until late July because Hans had a week-long camp in July and I needed some extra planning time after helping with my brother’s wedding at the end of June. We’re also ending early this year because of the dates we ended up being able to rent a beach house with friends.
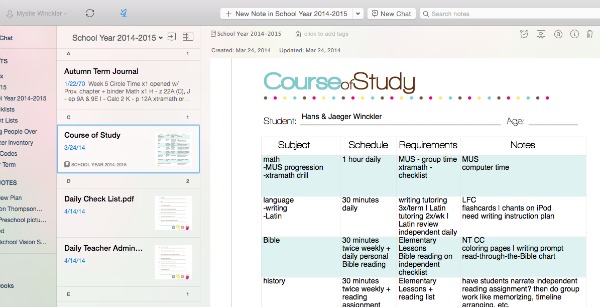
So knowing our general rhythm to the year, I print off a “Clean Calendar” from DonnaYoung.org that begins in July and goes through June. I mark birthdays and holidays and other important dates to take into consideration, then I start marking terms.
I start by working backwards from Thanksgiving. We always take Thanksgiving week off, so I mark 6 weeks before that to begin. I mark 3 terms before Christmas and 3 terms after Christmas, and I always do my best to finish up in May. My birthday is June 1, and from the time I was 9 or 10, I always tried to finish all my school before my birthday. Now I’m in charge of the academic calendar still, and I still set a goal of finishing before my birthday.
Now that we do some of our school with friends, there’s another step to our planning process. Whenever we do school planning together, we’ll go over the terms dates together and adjust as necessary to make it work for both of us. Then after Christmas we go over the remaining half of the schedule again and have the opportunity to adjust again. We are not opposed to “adjusting” those 6-week terms into 5-week terms if that’s what it takes to make school and life fit together graciously.
After I make that on paper with highlighting, I stick the paper version on my clipboard and also scan it into Evernote.
4. Terms & Materials
So with 6 terms decided and a course of study outline, I can start planning in 6-week chunks. Usually by this point I have already been browsing used books online and made some purchases as well as pulled materials off my shelf I already have. I start making notes about how many chapters books have and about how long we’d spend in a book and so the year starts taking shape.
This is when I browse the books, see how they might be divided up, and take notes on how I might fit them into the 6-term model. Since I rely more on simply reading real books than following curriculum, my term and materials plans amount basically to book lists, split into 6 blocks.
This often begins as a subject list, with books or materials listed underneath it, like this:
Once all those steps are thought through and listed out, it’ll be time to start putting together the nitty-gritty term, week, and daily plans.
Homeschool Lesson Plans in Evernote
So, you have Evernote set up, you are using it to gather inspiration and ideas for your homeschool, you know how to get your stuff into Evernote, and you have the beginnings of your homeschool year overview saved in Evernote.
Now let’s start getting into real, nitty-gritty homeschool planning with Evernote: Evernote homeschool lesson plans.
There are many ways to do lesson plans, even within Evernote. I’ll give you three ideas here.
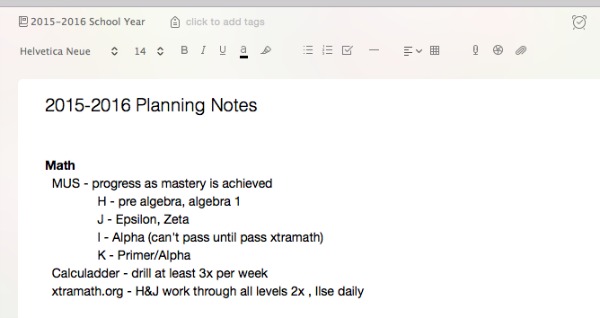
1. Homeschool lesson plans in Evernote as lists
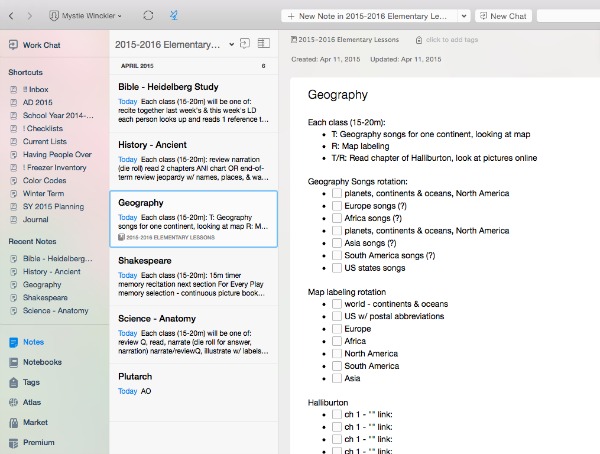
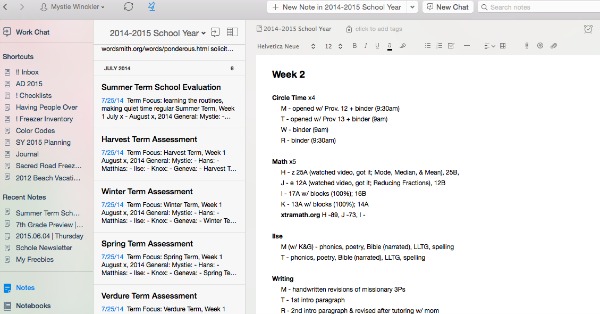
This year I included a “word a week” in our twice-weekly “Elementary Lessons” co-op with kids 8-11. I made the entire plan for the year during the summer within Evernote. Here’s what it looks like:
We do six six-week terms, but I knew I’d want to use the last week for review. So I picked 5 words per term and simply put them into lists of 5, linking to the wordoftheday page where I found them.
So, all I had to do when it was time for our word of the day slot was open up the note with a quick search, then click on the next word’s link. Up popped the definition for me to read and copy onto the board, and with that we were off to the races.
This list-as-lesson plan would also work with read-alouds (make a list of books and just move down the list as you read them), too. I’m planning on utilizing it a lot more extensively this coming year because it worked out so well this year.
When next year is planned, I promise to show you my Evernote homeschool plans.
2. Homeschool lesson plans in Evernote as saved tables
If you’ve made lesson plans in some other format, of course you can also simply move those into Evernote, where they will be faster to pull up and more likely to be saved long-term.
I have saved tables I made in the word processor into Evernote as a pdf. Saving it and using it from Evernote worked well enough, but for some reason I thought scheduling things out in detail for each class would work this year. But it didn’t, of course. We’d be on schedule in one subject, behind on another, and maybe even ahead in a third. And that meant I simply ignored it and went back to my simpler plan: Pick up the book, open to the bookmark, read.
Now, sometimes my lesson plans are a little more detailed of a list, but still basically a list. Here are my writing class plans, for example:
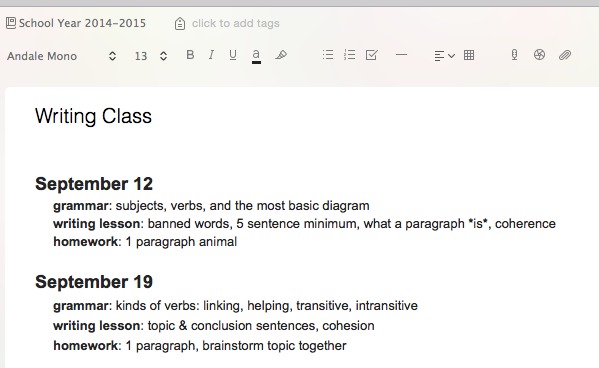
Not much detail, but I took what I wanted to cover and spread it out over the year to make sure we would be able to get to it all and still have enough time to practice the skills before moving on.
3. Homeschool lesson plans in Evernote as detailed notes
If you tend to write more detailed lesson plans for some subjects, you can do this directly in Evernote, too. The formatting options can add more organization than a straight plain text editor, and those lesson plans are then available for subsequent children without having to hunt for them years later!
If you want your lesson plans to be easily reusable, then label the lessons by number rather than by date. This will help if your school year gets out of sync due to sick days or other opportunities that cause rescheduling.
So, something like this:
Begin by creating your lesson plan format, then cut and paste that as many times as you need to into the note. Then you can go back and start filling it in, and already have a head start with the outline you’ve set out for yourself.
Writing homeschool lesson plans can be as varied as the people making them, and some subjects lend themselves to different types of planning than others.
No matter how you make your lesson plans, however, they can be kept safely in Evernote.
How to Use Evernote for Homeschool Loop Schedules
Have you heard of loop scheduling for your homeschool? Sarah Mackenzie wrote about it awhile back and got us all thinking and talking about it: Loop Scheduling for a Recovering Type A.
Pam Barnhill, in her Plan Your Year Kit, includes a section detailing the why and how of loop scheduling, and the kit also includes an audio interview with Sarah Mackenzie on how to make a loop schedule work.
So, how can we use Evernote for loop schedules and make them even more handy? I’ll show you how.
First of all, remember that not everything belongs in your loop schedule. Only those subjects that need to be done in rotation, not daily, go into the loop schedule. Then, in your homeschool time budget, you reserve a slot for “lessons,” and the loop tells you what to pick up next. You work through the loop in the time allotted, but once the time is up, you put it all away, picking it back up with the next item in the loop next time.
It’s a brilliant tactic, and Evernote can help you pull it off smoothly.
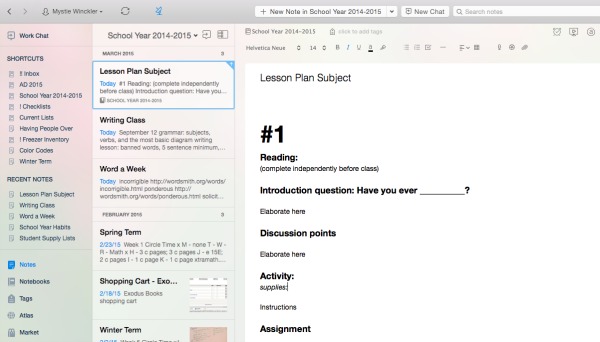
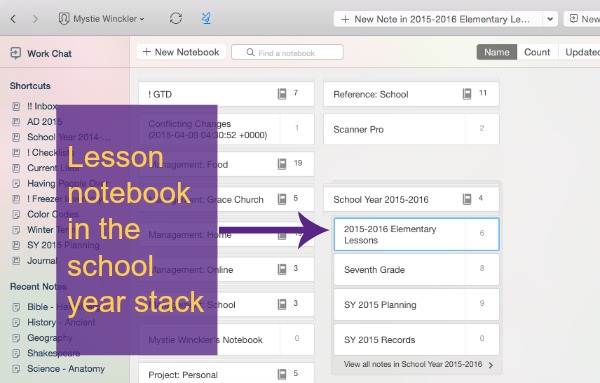
1. Create a loop schedule notebook, then add one note per subject in the loop notebook.
So, for mine, I titled the notebook “Elementary Lessons,” because that’s what we call the twice-weekly time where I do content lessons with my own and my friend’s big kids while the younger ones are at her house.
Then, each note inside it is one type of lesson I plan to do during our two-hour time period together. If each one takes about 20 minutes as planned, then we can do them all in one day. However, I know transitions and bathroom breaks and questions all take their toll, so it’s unlikely we’ll get to all of them every single class. That’s ok – with a loop schedule, that all becomes part of the plan instead of breaking the plan.
Inside each note, you have a few options. They might be your lesson plans, your list of books to read aloud, links to things to watch or listen to, or whatever else you do for that subject.
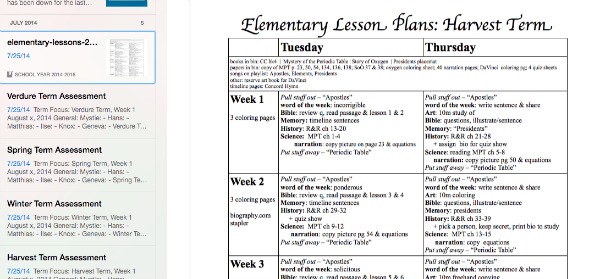
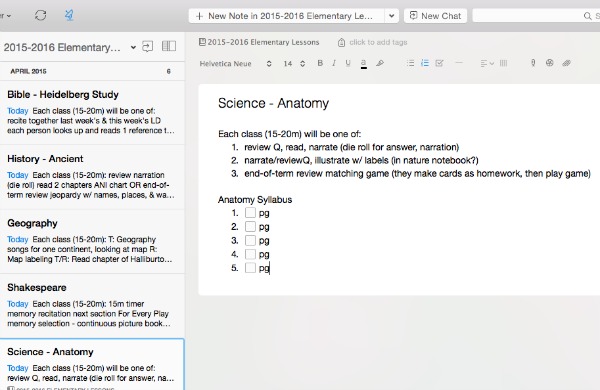
Here’s the beginnings of mine for science. We’ll be reading Anatomy, and so I’ve flipped through the book and written down chunks that should take approximately 15 minutes to read. Between chapters, I have an alternate reinforcement activity planned in. Now, instead of assigning those sections and activities to specific dates, which is thrown off the first sick day, or instead of winging it (more my style), we can just “do the next thing” in the list. The last week of every term will have its own special review game, regardless of where we are in the book. So, I made sure that this list has no more than 50 items, even though we’ll have about 60 classes planned.
For Shakespeare, my note has what each 20 minute lesson should contain, then a list of each of the things we’ll do for each play, then after that comes the three plays I’d like to do this year and the sources we’ll be using for each of them.

When we do Shakespeare in class, I’ll start a 15 minute timer. When the timer goes off, I wrap up what we’re reading or discussing and prepare to move on to the next thing. So whether we listen to one scene or half a scene, we’re only reading along to 15 minutes of play rather than pushing through an entire act or getting through as much as we can to wrap it up (which is what I ended up doing this last year, to the detriment of our comprehension and enjoyment).
2. Arrange the notes by date last modified.
You’ll note that each of the items in these lists have checkboxes. When we finish one item on the list, I can check it off so I know what to do next when we come round to it again.
Here’s where the magic of Evernote comes in. At the little icon up at the top of the notebook sidebar, there is a menu item called “Sort by.”

Choose “Date Updated” as your sorting option, then “Least Recent to Most Recent.”
Now Evernote will be the one looping your subjects for you – you don’t have to keep track of what’s next!
3. Work from your list when you start or after you’re done.
Whenever you check a box in a note, Evernote will move that note to the bottom of the notebook. Whichever lesson-note you’ve not done recently will be at the top of the notebook. So, whenever your time slot starts, you start with the note at the top of the notebook, do the next thing in the list inside that note, mark it off, then move on to the next note that is on top. Each time you check a box in the note, it will move to the bottom of the notebook.
Using Evernote for loop schedules is a great way to set up your lessons for “do the next thing” ease!
Evernote for Homeschool Record-Keeping
I feel pretty silly writing a post about homeschool record-keeping, because it’s an area that I am horribly inconsistent in and one I do not prioritize. I always think I’ll do better, and every year I do a little better, but not by much. Still, I have a plan for record-keeping. Does that count for anything? (FYI: records other than yearly standardized test results are not required by our state, so I’m not shirking my legal responsibilities).
Still, as I baby-step my way into better homeschool records, Evernote has made it so much simpler and more likely to happen. The following suggestions for records to keep in Evernote are taken partly from my own practices, partly from my own yet-to-be-implemented plans, and partly from tips I’ve learned from others.
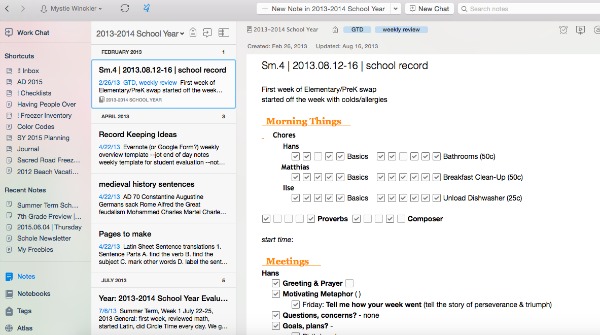
Keep one note per term or per week
I started off last school year by making a template for term record-keeping, where I’d jot a note about what we did at the end of each week, and start a new note each term.
If your lesson plans are already in Evernote, then you can copy them into a record note or adjust them on the fly to be accurate to what actually happened, and have a simple process.
In 2013 I made my teacher-checklist in Evernote and did not print it. I used the checkboxes, which was fun, but it was too cumbersome to check on the fly in the middle of multiple children’s lessons, and I never got into the habit of coming to it at the end of the day to write down what we’d done.
Still, for someone with more discipline, it could work. :)
Scan paper checklists each week
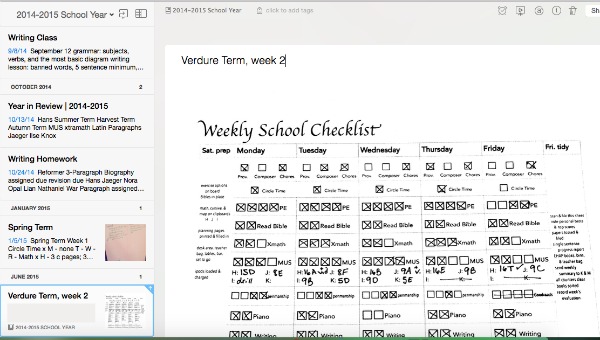
This is what I ended up doing by the end of last school year, and what I plan to do next school year. I already have a paper teacher checklist for the week, where I note what actually happened in the boxes, so why do additional record keeping when I can simply save that digitally?
At the end of the week (I do it during my weekly review on Saturday morning), I snap a picture of the completed weekly checklist (cough after finishing filling it out quickly) in Evernote and title the note with the picture Spring Term week 2 (or whatever term and week it is).
Scan sample work and snap a photo of projects as you go
If you have more creative projects in your homeschool or want to also keep samples of completed work, you can also take a picture of those in the same way! This allows you to keep a reminder or record of what you did without having projects and papers overrun your house.
The benefit of doing this sort of recording is that you do it here and there as you go, and it’s never a big project at the end.
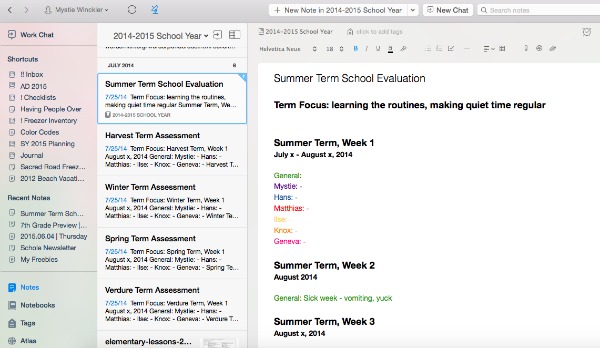
Write narrative assessments each week, term, semester, or year
Even if you keep records in one of the previous ways, it can still be a good exercise to write out an assessment for each student or for your school year. You might use a template or form or just free-form journal. Whether you do so every week or every term or every semester or simply every year, simply typing into Evernote makes it simpler to get the words out and safely saved.
Create end-of-year portfolios, save as pdfs, send to Evernote
If you do end-of-year portfolios like Sarah Mackenzie’s, you have a few options for saving those in Evernote as well.
First, you could make the paper-based folders, then scan or photograph when you’re done with them.
Second, you could make them entirely in Evernote. Create a notebook for each child, and a note for each “page” of your binder. Insert the photographs and words you want – if you are taking photos as you go, then you might even send the best ones to this notebook throughout the year rather than waiting for the end of the year.
Merge records at the end of a term or a year
If you end the school year with numerous separate notes and want to condense the proliferation into one note or only a handful, you can use the Evernote feature that allows you to merge notes. Rather than explain it, I thought I’d just show you:
Handy, isn’t it?!
P.S. The cute planning pages in the video are from Plan Your Year Kit, which can be filled out on your computer and saved directly to Evernote if you prefer not to print!
So here you are going to see how not tech savvy I am. Right now I use bookmark folders to sort things I need from different websites and make documents and put those into different folders on my computer. Why would Evernote be better than this? Do you have to be online to use Evernote? Can I use Evernote on my phone and on my laptop? Do I actually make my charts for Morning Time and my kid’s checklists in Evernote? If I still make these things as documents, why would I stick them in Evernote instead of just in the different folders on my computer? I do not use Pintrest at all and I don’t want to. So I have no idea what you are talking about with replacing that. Basically I’m trying to figure out how to organize homeschool stuff because I keep adding more kids to the mix, but I am just adding more bookmark folders and more documents. And it’s driving my poor hubby insane every time he gets on our laptop. But at least I put documents into folders now. I used to just keep them all on the desktop. He made folders for me and pleaded (in a very loving way) for me to at least use those and keep the desktop clear. So I guess I’m sort of looking forward to this series. But I’m wondering if I would rather just keep my head in the sand (tech wise) and keep on as I have been. Ha! =)
I’ll try to make sure I cover all these questions in the series, Virginia! :)
Mystie! This is so timely for me! I am right in the middle of going through all of my paperwork…and feeling like I need some kind of paperless organization for school records. I knew you used Evernote but have not done much looking into it. THANK YOU for walking us through this!
I am a paper and pencil gal. I love my lists that I write by hand. I love to type and all, but I am extremely resistant to these things that keep things on the computer for me! ;) I feel like it’s less accessible. But since this thing is FREE, I am taking the plunge and am going to try this. My brain has so much going on (yes, I’m still dumping it) that I’m feeling I might need this. It can’t hurt to try!! And I also do the folder thing in my bookmarks in my browser. Maybe this will be a better way to organize. I am hoping so, because Mystie and Sarah highly recommend it! So I’m gonna do it! Thank you for taking the time to teach us and encourage us!!
Check out the post on how to scan your handwritten notes into Evernote to save them: http://simplyconvivial.com/2015/how-to-scan-into-evernote
It doesn’t have to be either digital or paper, all or nothing. :)
Mystie, It appears that it now costs $5 to be able to access your saved notes, pins, whatever, while offline… do you think the premium membership is worth $5 a month? wondering your thoughts on this.. I cant decide.
I don’t pay for the premium yet. So far when I’ve been using Evernote extensively, I’m somewhere with wifi. And even offline I can still create a new note and write, it just won’t save and sync until I get to an internet connection again. Although, on my iPod Touch I generally take notes in the app Drafts, which can be configured to automatically save to Evernote when I return to wifi.
The premium feature that tempts me to subscribe is being able to edit and annotate pdfs within Evernote. :)
i ended up getting the premium. I like being able to read my stuff while riding in the car. Also that enables me to upload more- like books that I have gotten
I LOVE this series btw! Thank you!!!
Thank you, thank you, thank you for all the work you’re doing for this series!! Seriously so helpful. I downloaded Evernote onto my PC a few years ago and it was waaaay too overwhelming to even start to use.
I love how you’ve broken everything down AND(!) that you’re using it in this series for homeschooling! EEK! Perfection. :) Thank you.